Introduction
This document explains how to integrate Snowflake with the PureAUTH Identity Platform and make Snowflake authentication passwordless.
Prerequisites
- You must have Administrator Access.
Add Snowflake SAML application on PureAUTH
- Login to https://live.pureauth.io/organizations/login/
- Navigate to the Applications tab.
- Select “Add Application”.
- Select “ Custom App“
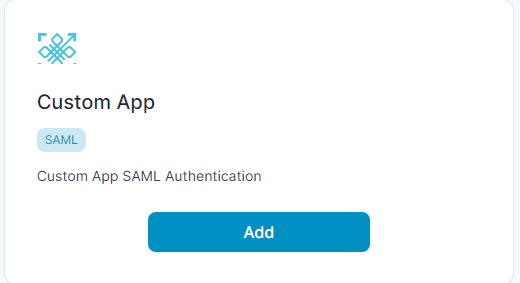
- Enter Any Application Name.
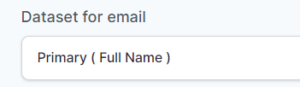
- Select Primary (Full Name ) in the Dataset for email field.
- In the “Saml Response Endpoint (ACS URL)” field, enter the give URL.
https://<Snowflake Account URL>/fed/login
- In the “Audience (Entity ID)” field, enter the given URL.
https://<Snowflake Account URL>
- In the “SAML Logout Response Endpoint (SLO URL)” field, enter the given URL.
https://<Snowflake Account URL>/fed/logout
- Click “Add“
To enable SAML single sign-on in Dropbox
- Login to your Snowflake Admin account.
- Go to Worksheets and create new worksheet.
- Rename worksheet as PureAUTH SAML.
- Open Worksheet and add below SQL Commands.
//Set SAML Provider

use role accountadmin;

alter account set saml_identity_provider = '{
  "certificate": "<SAML Certificate (Generated in PureAUTH), Copy the certificate under —-BEGIN CERTIFICATE — and —END CERTIFICATE — and paste>",
  "issuer": "<Issuer URL (Entity ID) (Generated in PureAUTH), Copy the Issuer URL and paste into the field>",
  "ssoUrl": " ",
  "type"  : "custom",
  "label" : "PureAUTH"
}';

//Enable SSO at Account Level
use role accountadmin;
alter account set sso_login_page = true;

//create security integration

use role accountadmin;

CREATE SECURITY INTEGRATION PUREAUTHINTEGRATION
TYPE = SAML2
ENABLED = TRUE
SAML2_ISSUER = '<Issuer URL (Entity ID) (Generated in PureAUTH), Copy the Issuer URL and paste into the field>'
SAML2_SSO_URL = '<Same as Issuer URL>'
saml2_provider = 'custom'
SAML2_X509_CERT = '<SAML Certificate (Generated in PureAUTH), Copy the certificate under —-BEGIN CERTIFICATE — and —END CERTIFICATE — and paste>'
saml2_sp_initiated_login_page_label = 'PureAUTH'
saml2_enable_sp_initiated = TRUE
saml2_snowflake_issuer_url = '<Snowflake_Issuer_url, Copy the AUDIENCE (ENTITY ID) from PureAUTH and paste>'
saml2_snowflake_acs_url = '<Snowflake_acs_url, Copy the SAML RESPONSE URL (ACS URL) from PureAUTH and paste>';

//Setup SAML ACS and ISSUER URL

use role accountadmin;

alter security integration PureAUTHintegration set saml2_snowflake_acs_url = ' ';
alter security integration PureAUTHintegration set saml2_snowflake_issuer_url = '<Snowflake_Issuer_url, Copy the AUDIENCE (ENTITY ID) from PureAUTH and paste>';

//Modify Login_name and make similar to snowflake

////alter user uname set login_name= 'uemail';

//Enable/Disable authentication

alter security integration pureauthintegration set enabled = true;
Verify SAML Authentication
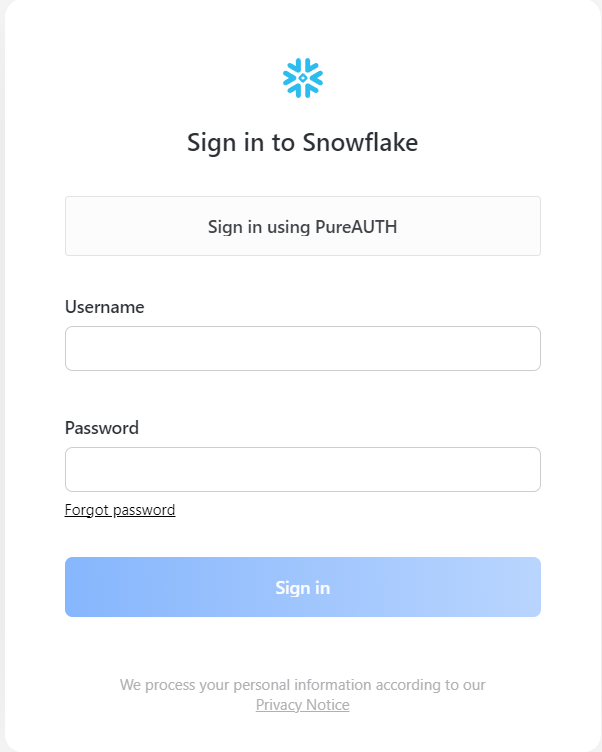
- Visit the Login endpoint.
- You will see the Button “Sign in using PureAUTH” click on it.
- You will be redirected to PureAUTH.
- Open the AuthVR5 app and scan the QR code using Swift Login.
Disable SAML Authentication
- Login to your Snowflake Admin account.
- Open PureAUTH SMAL Worksheet.
- Under //Enable/Disable authentication > Change it to “false”.
alter security integration pureauthintegration set enabled = false;